Submit an Additional Payment
Some courts may allow you to submit an ad hoc (separate) payment for a case. You'll access this functionality through the Case Details page. See Submit an Ad Hoc Payment for a Case for details.
A court may be configured to allow you to submit one or more additional payments as a subsequent bundle for an existing case or when initiating a new case. Additional payment types can include:
Filing (static) Fee - a fee whose amount is set by the Court.
Adjustable Filing (filer provided) Fee - a fee whose amount is specified by the filer.
Quantity-based Filing Fee - a fee associated with multiple instances of a court-configured service - such as requesting a specified number of Certified copies.
Important to note:
- Based on court configuration, you can submit the payment with or without a filing bundle for an existing case.
- Additional payment submissions are not served and will not be included in the Proof of Service.
- If your Notification Settings are set to notify you when a payment transaction occurs, you'll be notified via text and / or email.
Based on court configuration, you can prepare additional payments at the same time you create your filing bundles on the Bundle Assembly page and then submit everything together, or you can prepare the payments and submit them without additional filings.
To submit an additional payment:
- Select File under Main Pages in the navigation pane.
- On the Create Filing page, select the Court where you'll submit the payment. Click herehere for details on how this list may be presented. You can also begin typing the Court in the field to filter the list.
Depending on court configuration, the courts in this list are presented as:
State / Court; for example:
California
1st DCA
2nd DCA
Court Group / Court; for example:
Circuit Courts
Oakland County Circuit Court
Macomb County Circuit Court
Probate Courts
Kent County Probate Court
Muskegon County Probate Court
- Select File to an existing case from the Action field drop-down list.
You're re-directed to the Case Search page. The Court field is auto-populated.

The Court may be configured to enable advanced case search. See Advanced Case Search for details.
- Input part or all of the Case Number or Case Title in the Search field. A court can configure their own criteria requirements for the Search field, so your search may be not based on case number or case title.
- Click Search.
- Locate the case in the search results and click the View icon to launch the Case Details page.

- Click the File to this Case button to launch the Bundle Assembly page.
If the court you're filing in allows the user to request that counsel / parties be added to a case, the Bundle Assembly page will include the Add Party to Case and Add Counsel to Case buttons. It will resemble:

- Select the Filer. This person will be listed on the History page as the Filer once the payment is submitted. Click herehere to view details about the filers available in this field's drop-down list.
The Filer field lists available filers. If you specified a TrueFiling user role, your name will be listed. See Manage your TrueFiling User Role to learn more.
The list is also populated with eligible filers you're connected to. Note that, if you file on behalf of a connection, you are considered the submitter, and the connection is considered the filer. If you submit on a connection's behalf, you are listed on the History page as the Submitter.
In some court systems, a connection must explicitly grant you permission to file on their behalf. If a connection has not granted this permission, that connection will not be listed in the Filer field drop-down. See Connections with Specified Permissions for details.
If you are a member of a TrueFiling organization, and the Organization Administrator has granted you permission to file on the organization's behalf, the organization will be listed. If these conditions are met, your organization(s) will be listed in the Filer field drop-down on the Bundle Assembly page. If you select the organization as the Filer, you will be recognized as the submitter filing on behalf of the organization. See File on an Organization's Behalf to learn more.
If the filer you want isn't listed, click Where's my filer.
- Input a Client/Matter Number, if one is required.
- Select the Additional Payments checkbox; the Additional Payments pane is displayed.

Important to note:
The Additional Payments option may be selected but disabled if you are submitting a case initiation bundle, and the court requires an additional payment as part of that process.
If an existing bundle contains a fee waiver, the Additional Payments option may be disabled, and you may not be able to add an additional payment to the bundle. If needed, you can Remove your Waiver Request.
If you submit a payment without a filing bundle, be sure the Serve Document checkbox is not selected.
- Click the Add New Payments button.
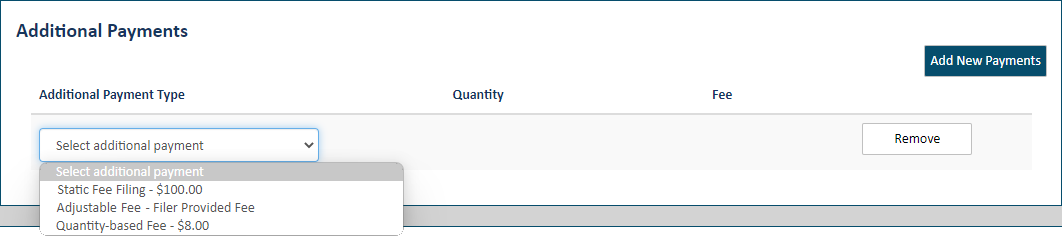
- Select the Additional Payment Type field to expose a list of available Payment Types. The types available are configured by the Court, and those presented are based on the type of case you're filing in.
- Select the Payment Type.
If you select a Static Fee (court-determined), the configured amount will auto-populate the Fee field.
If you select an Adjustable Fee (filer provided), input the payment amount in the Fee field.
Enter a valid numeric value; for example, 25.00. You must input a value greater than $0.00.
The Court can configure the fee format. For example, a court can choose to accept only whole dollar amounts and not allow decimal values ($50 vs $50.15). If the fee you input does not adhere to the required format, an error dialog will display. The dialog may list the required fee format.
If you select a Quantity-based Fee, input the Quantity, which is the number of Statics Fee payments to submit. The total fee will be auto-calculated.
To illustrate using an Adjustable (filer provided) Fee:

Click Remove to remove the payment entry, if necessary, and confirm the deletion in the dialog displayed.
Important
As noted above, a court may require an additional payment be automatically included with a submission. In such a circumstance, the Additional Payments section may be configured to prevent the removal of that payment, and the Remove button will not be available.
Additionally, the court may determine that the Add New Payments button should not be visible to prevent you from adding more payments.
- Add more payments, if required.
- Click Next on the Bundle Assembly page to submit your payment(s) to the court.
The payment submission is validated. If issues are detected - such as an improper value or format - a validation error dialog is displayed. Correct any errors and repeat step 15.
If no errors are present, the Checkout dialog is displayed.
The Court can configure select components of the Checkout dialog (such as Fee Type names or button labels), so the dialog shown below may be different than what you'll see.

Any Processing Fees and taxes mandated by the Court associated with the additional payment type are computed based on the amount you're paying.
Important: The Request Fee Waiver button is disabled if the filing bundle contains an additional payment.
- In the Fees pane, confirm the amounts listed are correct.
- Scroll down to select the appropriate Payment Account.
Information about Payment Accounts
In some court systems, a connection must explicitly grant you permission to use their shared payment accounts. If any connection has not granted this permission, you will not see that connection's shared accounts on the Checkout dialog.
If no payment accounts are listed, click the Add Payment Account button. Learn how to add a payment account.
If you identified a default payment account, that account is listed first in the Available Payment Accounts section and is auto-selected. See Specify a Default Payment Account.
Depending on court configuration, a payment account can be a credit card, escrow account, or Inter Agency Transfer payment account. Escrow and Inter Agency Transfer accounts must be authorized by the court. Refer to the Glossary for more information.
If you select an Inter Agency Transfer account, the court must be configured to support that payment type. If it's not, an error dialogerror dialog (click to view) is displayed after you click the Submit button on the Checkout dialog. Click OK to close the dialog. You'll be returned to the Bundle Assembly page.

Expired payment accounts are identified as such on the Checkout dialogCheckout dialog (click to view) and cannot be selected for payment.

- Click Submit to submit your payment to the court. A confirmation dialog is displayed when the submission is successful.
- Click OK to close the dialog.
The History page is displayed.
Your payment is listed on the History page. If you click the payment's Filing Name, properties related to the payment are displayed as they are for a court filing document. See Filing History for details.
Learn how to download your filing's payment receipt.