Bulk Filing Case Data
Step 1 in the Bulk Filing submission process is to prepare the case data CSV file and upload it.
The CSV file's required structure and content is determined by the Court, Case Type, and Submission Type (existing case / case initiation) you specified. See Specify the Court, Case Type, Submission Type, and Filer for details.
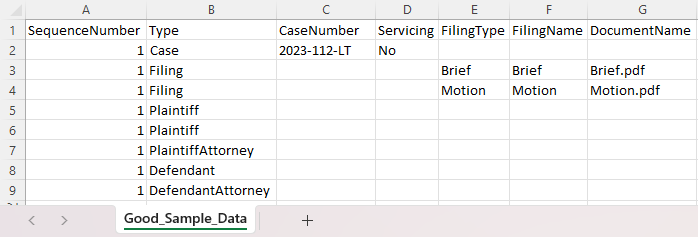
The CSV file must contain the required case data for EACH bundle that will be submitted in the batch. The first column identifies the Bundle Number. While the data required is configured by the Court, these fields must be present:
- SequenceNumber
- CaseNumber (for existing cases)
- Servicing (not applicable for case initiation)
- Type
- FilingType
- DocumentName
The CSV File Template
You can download a template of the CSV file that's configured specifically for the Court, Case Type, and Submission Type you specified. General instructions about the template are provided.

The template available for download is specific for the batch type you specified. To illustrate:

You can access instructions for completing the file via the CSV Instructions link. The file containing the instructions will download and launch in a separate browser window. The file downloaded may be any type such as Word, PDF, or Excel file.
Prepare the Case Data CSV File
- Access the CSV instructions for details on the required data and format.
- Click the template download link.
- Locate the CSV file in your Downloads folder and open it.
- Populate the template fields. The data must be precisely structured. Specifically:
The bundle data must be structured in sequence. For example, a connected document must be listed below its primary document.

A party's attorney must be listed below the party. For example, an attorney listed below the Plaintiff must be the Plaintiff's attorney.

The document name listed must be the exact name of the file that will be uploaded through the portal.
Further, the case type represented by the Case Number listed must be of the same type you specified when you initiated the Bulk Filing process (see Specify the Court, Case Type, Submission Type, and Filer for details).
- Save the file.
Upload the CSV File
Once the CSV file is complete, you must upload it.
- On the Bulk Filing Assembly page, click the Upload File box.
- Navigate to and select the CSV file in the dialog displayed. You can also drag and drop the file from File Explorer into the box.
Case Data Validation
Validation is performed against each necessary data item in the file during the upload process to ensure all requirements are met. Further, validation is performed to ensure the case data uploaded is associated with the Case Type you specified when you initiated the Bulk Filing process.
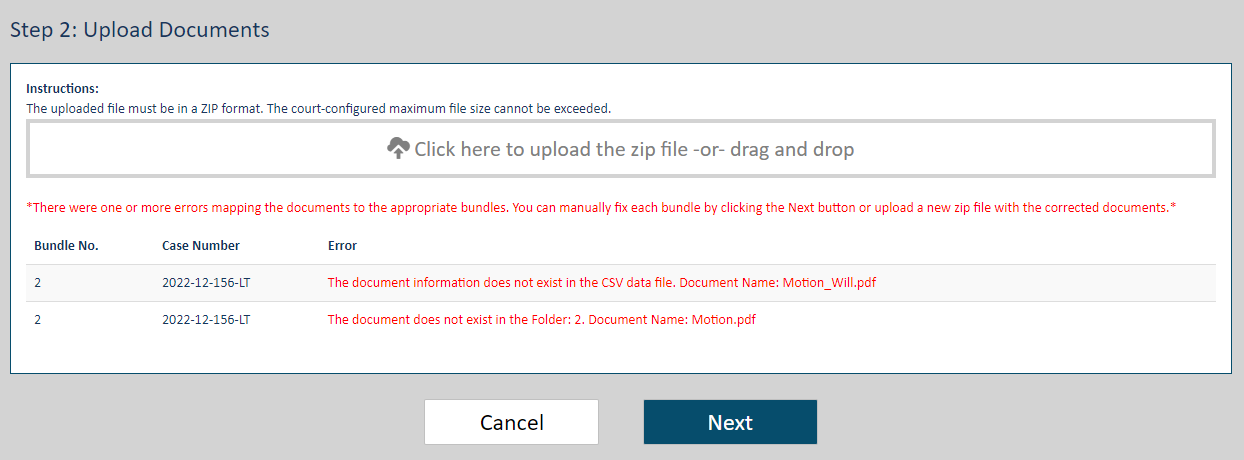
Any validation errors returned are listed on the Bulk Filing Assembly page. The error's corresponding line number in the CSV file is listed for reference.
The court can set a limit on the allowable number of validation errors to report. Once this limit is reached, the validation process is stopped.
A message is displayed indicating you can't proceed until the noted errors have been resolved.
Click the Cancel button if you want to cancel the batch submission.
If you continue, you must return to the CSV file, make any needed updates, and then re-upload the file. All errors must be rectified before the batch submission process can proceed.
Servicing Validation
If a bundle can't be served (for example, if a valid email address isn't listed in the CSV file), a warning is displayed indicating such. It will resemble:

IMPORTANT
A warning is not considered a critical error and won't prevent you from proceeding with the batch submission.
However, it's important to understand that, after all validation errors have been resolved, the bundle associated with the servicing error will not be served. (This is similar to the requirement that you de-select the Serve Filing checkbox on the Bundle Assembly page if a valid email address is missing.)
All servicing warnings will be summarized and listed in a validation error grid or a modal dialog when the CSV file is successfully uploaded.
Click OK to proceed to Step 2 - Document Upload or click Cancel to upload a different CSV file.
Successful Upload
Once Step 1 is complete, you can proceed to Step 2 - Upload the Filing Bundle Documents. See Bulk Filing Bundles to learn how.