
As you move through the submission process, TrueFiling performs various validation checks on your uploaded filings and filing bundle. For example, validation can be performed to ensure an uploaded filing doesn't exceed the maximum document size set by the court.
Validation can also be performed on the filing bundle; for example, a court can require that a filing document be included when submitting a case initiation form. Validation will be performed on the case initiation bundle to ensure the required filing document has been submitted.
For bundle validation, a court can be configured such that this validation is performed before the filer selects a payment account on the Checkout dialog and submits the bundle to the court. If the court is not so configured, the validation will be performed after submission.
Validation examples include:
If you didn’t select a Filing Type for an uploaded filing, this validation error dialog is displayed after you click Next on the Bundle Assembly page.
Click OK to close the dialog.
Return to the Bundle Assembly page and select a Filing Type.
If an uploaded document exceeds the maximum file size set by the court, a dialog resembling the following is displayed after you click Next on the Bundle Assembly page.

Click OK to close the dialog.
Remove the filing document from the Bundle Assembly page.
Restructure the document into smaller documents that don't individually exceed the file size maximum.
Upload the document.
Click Next on the Bundle Assembly page to begin the submission process.
If a filing document violates the document restrictions set by the court, a dialog resembling the following is displayed once the filing document is uploaded.

Click OK to close the dialog.
Remove the filing document from the Bundle Assembly page.
Ensure the upload document conforms to the court specified restrictions.
Upload the document.
Click Next on the Bundle Assembly page to begin the submission process.
If a specific filing type is required for subsequent filing, and the filing bundle does not include a filing of that type, a dialog resembling the following is displayed after you click Next on the Bundle Assembly page.

Click OK to close the dialog.
Upload the required filing type to the bundle.
Click Next on the Bundle Assembly page to begin the submission process.
If you upload a PDF file that contains unapplied redactions, those redactions are removed upon upload. A dialog resembling the following is displayed after you click Next on the Bundle Assembly page if the uploaded filing document contains unapplied redactions.

If you don't want to submit a filing document whose redactions have been removed:
Click Cancel to close the dialog. Focus is returned to the Bundle Assembly page.
Remove the filing document and upload the correct document (see Upload your Filing Documents for details).
Click Next on the Bundle Assembly page to begin the submission process.
If you want to submit the filing document with unapplied redactions:
Click OK. The submission process will continue.
If you have requested a fee waiver, validation is performed to ensure your bundle contains at least one filing document. A dialog resembling the following is displayed after you click Next on the Bundle Assembly page if there isn't an uploaded filing document associated with the fee waiver request.

Click OK to close the dialog. You’re returned to the Bundle Assembly page.
Upload the filing to submit (see Upload your Filing Documents for details).
Click Next on the Bundle Assembly page to begin the submission process.
For fee waiver requests, validation is also performed to ensure your bundle is not Serve Only; that is, it is only served to recipients and not filed with the court. If it is Serve Only, this dialog is displayed:

Click OK to close the dialog.
Either select the File document option (on the Bundle Assembly page) so the document will be filed to the court or remove your fee waiver request (see Remove your Waiver Request for details).
Click Next on the Bundle Assembly page to begin the submission process.
A court can be configured to not allow filings with the Sealed or Confidential attribute to be served. If you applied the Sealed or Confidential attribute to any filing in the bundle, and you chose to serve your filing by selecting the Serve Document option on the Bundle Assembly page, your submission will fail. This message will display after you click Next on the Bundle Assembly page.

In courts so configured, sealed and confidential documents cannot be served; however, they can be filed to the court.
Click OK to close the dialog.
Return to the Bundle Assembly page and uncheck the Serve Document option.
Click Next to begin the submission process.
If you selected the Serve Document option, but no recipients are available or selected in the Select Recipients pane, this dialog is displayed when you click the Next button on the Bundle Assembly page.
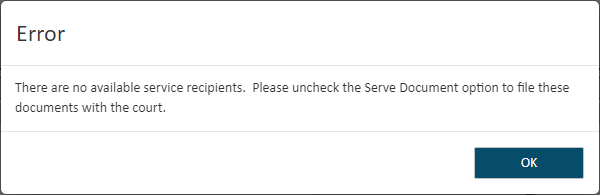
Click OK to close the dialog. Focus is returned to the Bundle Assembly page.
De-select the Serve Document option or select a recipient (if the court permits).
Click Next to begin the submission process.
If you selected the Serve Document option, but the recipient selected in the Select Recipients pane has no email address, this dialog is displayed when you click the Next button on the Bundle Assembly page.
Click OK to close the dialog. Focus is returned to the Bundle Assembly page.
De-select the Serve Document option.
Click Next to begin the submission process.
The court may require at least one recipient that is NOT the filer or submitter (logged in user) be selected for service in the Select Recipients pane. If so configured, and another recipient is not selected, this dialog is displayed when you click the Next button on the Bundle Assembly page.
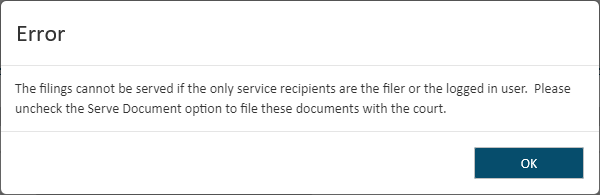
Click OK to close the dialog. Focus is returned to the Bundle Assembly page.
De-select the Serve Document option or select a service recipient that is NOT the filer or submitter (if the court permits).
Click Next to begin the submission process.
If the filing type you selected is Service Only, and the File Document option is selected, this dialog is displayed after you click Submit on the Checkout dialog.

Click OK to close the dialog.
Return to the Bundle Assembly page.
Either select a non-Service Only filing type or de-select the File Document option.
If you select an Inter Agency Transfer payment account, the court must be configured to support such payment. If it's not, this dialog is displayed when you click the Submit button on the Checkout dialog.

Click OK to close the dialog. Focus is returned to the Bundle Assembly page.
Click Next and proceed to the Checkout dialog.
Select a valid payment account.
Proceed to submit and checkout.
See also Submit your Filing Bundle